

Remember to Back Up Your Test Files
Making provisions for safeguarding your test files against data loss or corruption is best practice. Deciding what to back up is usually very straightforward. Anything you cannot replace easily should be at the top of your list. Before you get started, make a checklist of files to backup. This will help you determine what to backup and also give you a reference list in the event you need to retrieve a backed-up file.
We have outlined here how to backup your wirelists files on different tester models.
Backing Up an Easy-Wire Database
See Backing Up Your Database with Easy-Wire
Legacy Testers
Backing Up a 1000-R+, 1000-H+, 1100-R+ and 1100-H+
|
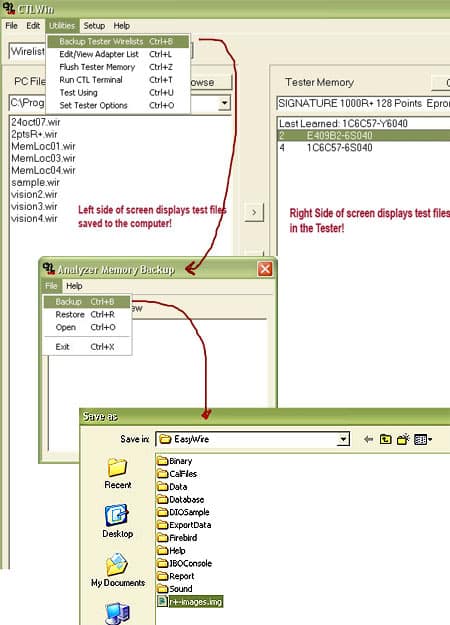
Using CTLWIN, a small utility designed for manipulating test files as well as backing them up, you can easily backup all the wirelists in your tester to a safe location. The files listed on the right side of the screen are those found in the tester’s memory and those on the left side of the screen are those stored in the computer’s memory. Simply click on the “Utilities” drop-down menu, select ‘Backup Tester Wirelist,’ and off it goes. See the instructions below for the complete process.
How to – Backup All the Wirelists in a Tester:
Note the backup location (folder path) that the file will be saved to. If you want to change the “Save To” location, click on the folder drop-down button and select a different folder. NOTE: This program stores all the wirelists together in one file with a .img extension. However, the .img file is a text file and can be opened with Notepad or any other text editor. You can delete files from the .img file if you wish without damaging the ability of the file to restore the remaining wirelist back to the tester later on. How to – Back up Individual Wirelists:
Note the backup location that the file is saved to. If you want to change the “Save To” location, select a different folder. That is all there is to it. |
Backing Up Wirelists on the Touch 1
Step by Step instructions to copy files from the Touch 1:
The following step-by-step instructions are designed to help you backup one or more wirelists on your Touch 1. These same instructions are not only used for making backup copies of your wirelists, but would also be used for moving any files (report files, script files, wirelists files etc. etc.) during your daily use of the tester.
|

|